什麼是WebSocket?
HTTP連線時,是一個Client端的請求發出後再由Server端回覆,Server端完成回覆後需待下次Client端再次發出請求後才會再次回覆。(如下圖)
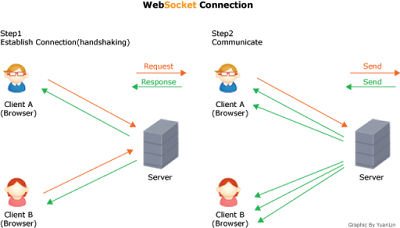
WebSocket時,先由Client端發出請求建立一個WebSocket連線(handshaking),連線完成後Server與Client彼此建立了一個雙向的連線,使得Server可不需再透過Client發出的請求即可直接送出訊息。(如下圖)
WebSocket需求
為了達到上述的目的,因此需要兩個部份的Code來完成,Server端及Client。
Server—這裡選擇用Tomcat8及Java來開發。
Client—支援WebSocket的瀏覽器及Javascript來開發。
WebSocket Code
- Server Side(Tomcat)
支援WebSocket的Tomcat需要7.x以上才可支援,需要的jar檔案是javax.websocket-api,若是Weblogic12.x或是Jetty9.x則不需要額外的Jar檔案。
- Server Side Code(Java)
/**
* Created by yc_lin on 2016/10/14.
*/import javax.websocket.*;
import javax.websocket.server.ServerEndpoint;
import java.io.IOException;
import java.util.HashMap;
import java.util.Map;/**
* @ServerEndpoint gives the relative name for the end point
* This will be accessed via ws://hostName:port/ApplicationName/echo
*/@ServerEndpoint("/echo")public class EchoServer {
static Map<String, RemoteEndpoint.Basic> allRemote = new HashMap<String, RemoteEndpoint.Basic>();
/**
* @OnOpen 透過此Method在開啟連線時可取得User的Session,將Session保存後可再次利用來傳送訊息
*/
@OnOpen
public void onOpen(Session session){
System.out.println(session.getId() + " has opened a connection");
try {
RemoteEndpoint.Basic basicRemote = session.getBasicRemote();
allRemote.put(session.getId(), basicRemote);
basicRemote.sendText("Connection Established");
} catch (IOException ex) {
ex.printStackTrace();
}
}
/**
* 當Server端接收到訊息時觸發
*/
@OnMessage
public void onMessage(String message, Session session){
System.out.println("Message from " + session.getId() + ": " + message);
try {
session.getBasicRemote().sendText(message);
for (String id : allRemote.keySet()) {
RemoteEndpoint.Basic basic = allRemote.get(id);
basic.sendText("123..." + message);
}
System.out.println("allRemote..." + allRemote.size());
} catch (IOException ex) {
ex.printStackTrace();
}
}
/**
* 當WebSocket連線關閉時觸發
*/
@OnClose
public void onClose(Session session) {
allRemote.remove(session.getId());
System.out.println("Session " + session.getId() + " has ended");
}
}
- Client Side Code(Javascript)
<html>
<head>
<title></title>
<script>
var wsLoc = "ws://hostName:port/ApplicationName/echo";
//WebSocket可以選擇ws或是wss通訊協定,ws就相當於一般的http,wss則相當於https
var ws = new WebSocket(wsLoc);
//當連線開啟時觸發
ws.onopen = function () {
console.log("Websocket is opened!!");
};
//收到訊息時觸發
ws.onmessage = function (msgEvent) {
console.log("Received Message!!", msgEvent);
var msgDisplay = document.getElementById("msgDisplay");
msgDisplay.innerText = msgEvent.data;
};
//直接測試傳送訊息
ws.send('Hello WebSocket.');
</script>
</head>
<body>Waiting for order!!<div id="msgDisplay" style="color: blue;padding: 15px;">
</div>
</body>
</html>
完整的Code就如上述的部分,需要特別注意的是ws://hostName:port/ApplicationName/echo這串WebSocket網址,echo是透過@ServerEndpoint的annotation所指定的,這部分也可透過extend EndPoint的方式進行,這邊就不另行討論。
其他參考資料:
http://blog.csdn.net/jia20003/article/details/48751847


.png)


.png)