顯示具有 tomcat 標籤的文章。 顯示所有文章

2016年10月23日 星期日

使用tomcat建立WebSocket

什麼是WebSocket?

HTML5後出現的新功能,主要功能可使Client端瀏覽器與Server端建立一個持續的雙向連線,有興趣查詢詳細說明請自行參閱WikiwebsocketIThome

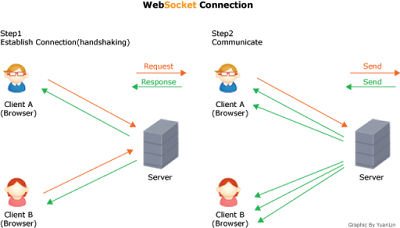
HTTP連線時,是一個Client端的請求發出後再由Server端回覆,Server端完成回覆後需待下次Client端再次發出請求後才會再次回覆。(如下圖)


WebSocket時,先由Client端發出請求建立一個WebSocket連線(handshaking),連線完成後ServerClient彼此建立了一個雙向的連線,使得Server可不需再透過Client發出的請求即可直接送出訊息。(如下圖)


WebSocket需求

為了達到上述的目的,因此需要兩個部份的Code來完成,Server端及Client

Server這裡選擇用Tomcat8Java來開發。

Client支援WebSocket的瀏覽器及Javascript來開發。


WebSocket   Code

  • Server   Side(Tomcat)

支援WebSocketTomcat需要7.x以上才可支援,需要的jar檔案是javax.websocket-api,若是Weblogic12.x或是Jetty9.x則不需要額外的Jar檔案。
  • Server Side   Code(Java)

/**
 * Created by yc_lin on 2016/10/14.
 */
import javax.websocket.*;
import 
javax.websocket.server.ServerEndpoint;
import 
java.io.IOException;
import 
java.util.HashMap;
import 
java.util.Map;/**
 * @ServerEndpoint gives the relative name for the end point
 * This will be accessed via ws://hostName:port/ApplicationName/
echo
 */
@ServerEndpoint("/echo")public class EchoServer {

    
static Map<StringRemoteEndpoint.BasicallRemote new HashMap<StringRemoteEndpoint.Basic>();

    
/**
     * @OnOpen 
透過此Method在開啟連線時可取得UserSession,將Session保存後可再次利用來傳送訊息
     */
    
@OnOpen
    
public void onOpen(Session session){
        System.out.println(session.getId() + 
" has opened a connection");
        try 
{
            RemoteEndpoint.Basic basicRemote = session.getBasicRemote()
;
            
allRemote.put(session.getId()basicRemote);
            
basicRemote.sendText("Connection Established");
        
catch (IOException ex) {
            ex.printStackTrace()
;
        
}
    }

    
/**
     * 
Server端接收到訊息時觸發
     */
    
@OnMessage
    
public void onMessage(String messageSession session){
        System.out.println(
"Message from " session.getId() + ": " + message);
        try 
{
            session.getBasicRemote().sendText(message)
;
            for 
(String id : allRemote.keySet()) {
                RemoteEndpoint.Basic basic = 
allRemote.get(id);
                
basic.sendText("123..." + message);
            
}
            System.out.println(
"allRemote..." allRemote.size());
        
catch (IOException ex) {
            ex.printStackTrace()
;
        
}
    }

    
/**
     * 
WebSocket連線關閉時觸發
     */
    
@OnClose
    
public void onClose(Session session) {
        
allRemote.remove(session.getId());
        
System.out.println("Session " session.getId() + " has ended");
    
}
}

  • Client Side   Code(Javascript)

<html>
<head>
    <title></title>
    <script>
        
var wsLoc = "ws://hostName:port/ApplicationName/echo";
        
//WebSocket可以選擇ws或是wss通訊協定,ws就相當於一般的httpwss則相當於https
        
var ws = new WebSocket(wsLoc);

        
//當連線開啟時觸發
        
ws.onopen function () {
            
console.log("Websocket is opened!!");
        
};
        
//收到訊息時觸發
        
ws.onmessage function (msgEvent) {
            
console.log("Received Message!!"msgEvent);
            var 
msgDisplay = document.getElementById("msgDisplay");
            
msgDisplay.innerText msgEvent.data;
        
};

        
//直接測試傳送訊息
        
ws.send('Hello WebSocket.');
    
</script>
</head>
<body>
Waiting for order!!<div id="msgDisplaystyle="colorblue;padding15px;">

</div>
</body>
</html>

完整的Code就如上述的部分,需要特別注意的是ws://hostName:port/ApplicationName/echo這串WebSocket網址,echo是透過@ServerEndpointannotation所指定的,這部分也可透過extend EndPoint的方式進行,這邊就另行討論。

其他參考資料:
http://blog.csdn.net/jia20003/article/details/48751847

2015年10月8日 星期四

網頁GZIP壓縮設定


 開發網頁時,若碰到內容較多的表單類或是資料表格(Data table or Data grid),常會讓網頁本身的文字內容就很肥大。

尤其若碰到需要引用一些javascript liberaryextjs or flex這種本身就很肥的東西,常常光基本結構還沒有放入任何內容就已經超過2-3MB了,開發測試時可能還感覺不出來,因為大部分都會在本地端開發,但是只要放在正式環境時就會看的出來影響了。

壓縮HTTP內容(HTTP Compression)


所以如果可以將資料壓縮後再傳送,就可以節省許多頻寬在傳輸上了。如下圖示可看的出來減少了網路所傳輸的資料量,但相對的會增加Server壓縮檔案及Browser解壓縮的消耗。


壓縮的效益


壓縮及解壓縮會消耗ServerBrowserCPU,但設定得宜的話,可以大大減少User等待網路的時間,因此視網站的資料情況設定合適的參數是很重要的。

而影音、圖片及壓縮檔案因大部分已經經過壓縮處理,因此不適合再透過Server做壓縮,會導致增加壓縮成本但網路傳輸量卻減少的有限的反效果。

建議只設定三種格式做壓縮,HTMLCSSJavascript。若透過JSON格式取大量資料的話,也可另外增加application/json的設定將其補上。

Tomcat GZIP Compression設定


找到${tomcat_home} /conf/server.xml,修改Connector的設定

<Connector port="8080" maxHttpHeaderSize="8192"
           maxThreads="150" minSpareThreads="25" maxSpareThreads="75"
           enableLookups="false" redirectPort="8443" acceptCount="100"
           connectionTimeout="20000" disableUploadTimeout="true"
           compression="on"
          
compressionMinSize="2048"
          
noCompressionUserAgents="gozilla, traviata"
          
compressableMimeType="text/html
, text/css, text/xml"/>

屬性說明(Copy From Apache)
compression
The Connector may use HTTP/1.1 GZIP compression in an attempt to save server bandwidth. The acceptable values for the parameter is "off" (disable compression), "on" (allow compression, which causes text data to be compressed), "force" (forces compression in all cases), or a numerical integer value (which is equivalent to "on", but specifies the minimum amount of data before the output is compressed). If the content-length is not known and compression is set to "on" or more aggressive, the output will also be compressed. If not specified, this attribute is set to "off".
Note: There is a tradeoff between using compression (saving your bandwidth) and using the sendfile feature (saving your CPU cycles). If the connector supports the sendfile feature, e.g. the NIO connector, using sendfile will take precedence over compression. The symptoms will be that static files greater that 48 Kb will be sent uncompressed. You can turn off sendfile by setting useSendfile attribute of the connector, as documented below, or change the sendfile usage threshold in the configuration of the DefaultServletin the default conf/web.xml or in the web.xml of your web application.
compressableMimeType
The value is a comma separated list of MIME types for which HTTP compression may be used. The default value istext/html,text/xml,text/plain,text/css,text/javascript,application/javascript .
compressionMinSize
If compression is set to "on" then this attribute may be used to specify the minimum amount of data before the output is compressed. If not specified, this attribute is defaults to "2048".
noCompressionUserAgents
The value is a regular expression (using java.util.regex) matching the user-agentheader of HTTP clients for which compression should not be used, because these clients, although they do advertise support for the feature, have a broken implementation. The default value is an empty String (regexp matching disabled).
  

Weblogic GZIP Compression設定

2.      把下載的jar放到${web_appliaction_home}/WEB-INF/lib
3.      開啟${web_appliaction_home}/WEB-INF/web.xml加入filter的設定
<filter>
    <filter-name>CompressingFilter</filter-name>
    <filter-class>com.planetj.servlet.filter.compression.CompressingFilter</filter-class>
    <init-param>
        <param-name>includeContentTypes</param-name>
        <param-value>text/html,text/css,application/x-javascript</param-value>
    </init-param>
    <init-param>
        <param-name>compressionThreshold</param-name>
        <param-value>256</param-value>
    </init-param>
</filter>

<filter-mapping>
    <filter-name>CompressingFilter</filter-name>
    <url-pattern>/*</url-pattern>
</filter-mapping>

參考資料:

2014年11月2日 星期日

Tomcat設定in Eclipse

1.下載Tomcat。
     下載時需要注意一下所需要開發的程式會用的版本,以下檢附寫文章時的當前版本資訊,下載前可先至http://tomcat.apache.org/whichversion.html確認。
Servlet SpecJSP SpecEL SpecWebSocket SpecApache Tomcat versionActual release revisionSupport Java Versions
3.12.33.01.18.0.x8.0.147 and later
3.02.22.21.17.0.x7.0.566 and later
(WebSocket 1.1 requires 7 or later)
2.52.12.1N/A6.0.x6.0.415 and later
2.42.0N/AN/A5.5.x (archived)5.5.36 (archived)1.4 and later
2.31.2N/AN/A4.1.x (archived)4.1.40 (archived)1.3 and later
2.21.1N/AN/A3.3.x (archived)3.3.2 (archived)1.1 and later
    以目前較穩定的版本是7.0.56,因此下載選擇http://apache.stu.edu.tw/tomcat/tomcat-7/v7.0.56/bin/apache-tomcat-7.0.56.zip,這裡由於要下載的是後續用Eclipse開發時運行的版本,因此不選擇安裝檔案。(Windows環境)

2.下載 Eclipse
     只要到Eclipse官網(http://www.eclipse.org/downloads/)下載即可,基本上由於我們要建立Tomcat,因此要選擇For Jave EE的版本(其中已包含選擇任一版本都可,但要符合作業系統的OS,這裡下載當前最新的64bit版本。
     

3.解壓縮Tomcat及Eclipse後,啟動Eclipse。
     
     
4.Ecilpse需要設定一個workspace,若是第一次設定則會自動建立目錄及所需要的設定檔案,這裡任意定義一個喜歡的地方吧。
     ●啟動Eclipse
     
     ●設定workspace
     
5.設定Tomcat Server
     ●進入Eclipse的畫面後,由File->New->Other開啟Wizard。
     
     ●輸入Server可以快速找到我們要設定的Server
     
     ●輸入Tomcat可以找到我們這次要建立的Tomcat Server類型,這次要設定的是7.0的版本,因此選擇Tomcat v7.0 Server。完成後按下【NEXT】進入下一個設定。
     
     ●這裡的Tomcat installation directory選擇剛才所下載解壓縮的tomcat目錄,而JRE可選擇Eclipse的預設JRE即可。設定完成後可直接按下【Finish】完成。
     
     ●設定完成後可選擇【Java EE】檢視,這時候可以看見左方的Project Explorer出現了Servers的folder,其中包含了此次所設定的Tomcat 7.0。也可在下方的Servers的Tab看見目前Tomcat的狀態。
     
     ●按下Server頁籤的即可啟動Tomcat。
     
     ●按下Server頁籤的即可停止Tomcat